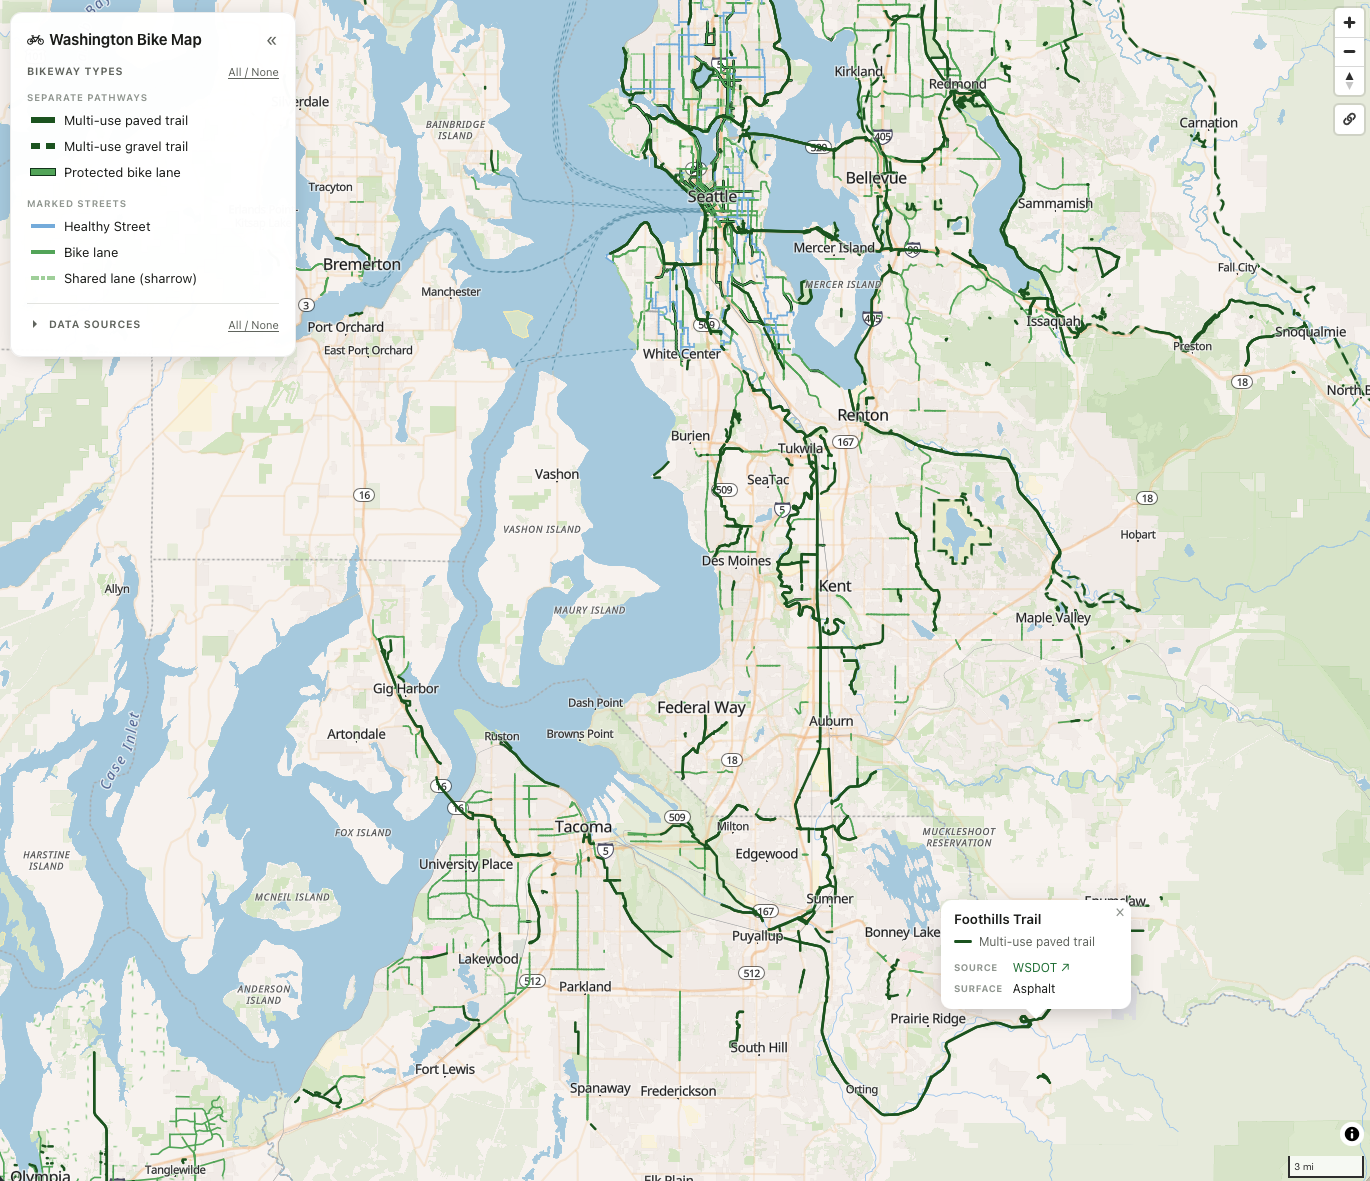
I’ve been wanting a better map for route planning around Washington state that focuses on protected bike paths now that we’re taking our little one on trips in the bike trailer. GIS data is generally scattered across ESRI embeds and PDFs from various state, county and city agencies and I decided to combine all the data I could into a single vector-based web map called Washington Bike Map.
I took inspiration for the categorization and visual styling from Seattle DOT’s great PDF-based bike map. The map breaks paths into two categories, Separate Pathways and Marked Streets. I’ve moved the Healthy Streets symbol into Marked Streets, since local traffic can still drive on them, and split Separate Bikeways into three symbols - multi-use paved trail, multi-use gravel trail and protected bike lane - to differentiate surfaces and flag fully separated trails for added safety.
All of the data sources are linked in the side panel, and you can also tap on a line to view the trail name, its source and its surface type.
- Create a new Rails 7 application:
$ rails new webscraper --database=postgresql - Move the following gems outside of the test group and bundle:
gem 'selenium-webdriver' gem 'webdrivers' - Run the following to add Linux as a supported platform within your Gemfile.lock, this is necessary to support the Heroku deployment:
$ bundle lock --add-platform x86_64-linux - Add a new file under
./app/scrapers/scraper.rbwith the following code:class Scraper def scrape require "selenium-webdriver" Selenium::WebDriver::Chrome.path = ENV["GOOGLE_CHROME_BIN"] if Rails.env.production? arguments = %w[--headless --no-sandbox --disable-gpu] options = Selenium::WebDriver::Chrome::Options.new(args: arguments) driver = Selenium::WebDriver.for(:chrome, options: options) driver.get("https://quotes.toscrape.com/js/") doc = Nokogiri::HTML(driver.page_source) doc.css('.quote').each do |link| puts link.content end driver.quit end end - Next create a rake task under
./lib/tasks/scraper.rbwith the following code:namespace :scraper do desc "Scrape" task scrape: :environment do scraper = Scraper.new scraper.scrape end end -
Run
$ rake scraper:scrapeand test that the scraper is functioning locally. - Commit your changes:
git add -A git commit -m "initial" - Next create a new Heroku app and add the following build packs:
$ heroku create $ heroku buildpacks:add --index 1 heroku/ruby $ heroku buildpacks:add --index 2 heroku/chromedriver $ heroku buildpacks:add --index 3 heroku/google-chrome - After deploying, run the following to test that the scraper is functioning in production:
heroku run rake scraper:scrape - If running the scraper as a recurring job, set up a new job using Heroku Scheduler: https://devcenter.heroku.com/articles/scheduler
Recently I integrated Firebase Authentication in an iOS application and used it to authenticate against a Rails API. I hadn’t found a complete resource that documents this end to end and wanted to share the steps I went through along with code samples to give others a head start. This specifically explores adding Firebase’s email and password authentication with a custom user interface.
Here are the steps:
1. Set up Firebase iOS SDK
Follow the instructions in this doc: https://firebase.google.com/docs/ios/setup In this step you’ll set up a new Firebase project, add the Firebase/Auth library and configure Firebase in your app delegate.
2. Create a struct to manage authentication on the client
Next you’ll want to set up a struct in the client for interacting with the Firebase Auth API. You can create functions for the basic auth operations that accept success and error handlers. The Firebase docs here are a great place to read more about these API calls: https://firebase.google.com/docs/auth/ios/manage-users
This struct includes the getUserState function, which allows you to check whether the user is currently signed in. This is an async operation and you’re able to pass in a handler to execute when the state has been evaluated. This is particularly useful when starting the application and determining if an auth view should be displayed. You can read more about the state change listener here: https://firebase.google.com/docs/auth/ios/start#sign_in_existing_users
// AuthenticationManager.swift

struct AuthenticationManager {
  func getUserState(
    handler: @escaping (_: AuthenticationState) -> Void
  ) {
    var state: AuthenticationState = .signedOut
    Auth.auth().addStateDidChangeListener { (auth, user) in
      if user != nil { state = .signedIn }
      handler(state)
    }
  }

  func signUp(
    email: String,
    password: String,
    successHandler: @escaping () -> Void,
    errorHandler: @escaping (_ message: String) -> Void
  ) {
    Auth.auth().createUser(withEmail: email, password: password) { _, error in
      self.handleAuthResult(
        error: error,
        successHandler: successHandler,
        errorHandler: errorHandler
      )
    }
  }

  func signIn(
    email: String,
    password: String,
    successHandler: @escaping () -> Void,
    errorHandler: @escaping (_ message: String) -> Void
  ) {
    Auth.auth().signIn(withEmail: email, password: password) { _, error in
      self.handleAuthResult(
        error: error,
        successHandler: successHandler,
        errorHandler: errorHandler
      )
    }
  }

  func passwordReset(
    email: String,
    successHandler: @escaping () -> Void,
    errorHandler: @escaping (_ message: String) -> Void
  ) {
    Auth.auth().sendPasswordReset(withEmail: email) { error in
      self.handleAuthResult(
        error: error,
        successHandler: successHandler,
        errorHandler: errorHandler
      )
    }
  }

  func signOut(
    successHandler: @escaping () -> Void,
    errorHandler: @escaping (_ message: String) -> Void
  ) {
    do {
      try Auth.auth().signOut()
      successHandler()
    } catch let error as NSError {
      errorHandler(error.localizedDescription)
    }
  }

  func handleAuthResult(
    error: Error?,
    successHandler: @escaping () -> Void,
    errorHandler: @escaping (_ message: String) -> Void
  ) {
    if let error = error {
      DispatchQueue.main.async {
        errorHandler(error.localizedDescription)
      }
    } else {
      DispatchQueue.main.async {
        successHandler()
      }
    }
  }
}

enum AuthenticationState {
  case signedIn, signedOut
}
3. Configure requests to send Firebase token
Setup an authenticatedRequest function that retrieves the user’s current token and sets as a header for requests. This will appear as HTTP_FIREBASE_TOKEN in the request headers.
// API.swift

func authenticatedRequest(url: String,
                          method: HTTPMethod = .get,
                          parameters: [String: Any] = [:],
                          successHandler: @escaping (_: Data?) -> Void,
                          errorHandler: @escaping (_: String) -> Void) {
  let currentUser = Auth.auth().currentUser
  currentUser?.getIDTokenForcingRefresh(true) { token, error in
    guard let token = token, error == nil else {
      errorHandler("Error completing request.")
      return
    }

    let headers: HTTPHeaders = ["Firebase-Token": token]

    Alamofire.request(url,
                      method: method,
                      parameters: parameters,
                      headers: headers).validate().responseData { response in
      switch response.result {
      case .success:
        successHandler(response.data)
      case .failure:
        guard let data = response.data,
          let errors = try? JSON(data: data)["errors"].stringValue else {
            errorHandler("Error completing request.")
            return
        }
        errorHandler(errors)
      }
    }
  }
}
4. Build authentication forms on client
At this stage you’ll want to add your custom sign in, sign up, and reset password views/controllers and wire them up to the AuthenticationManager functions. You’ll also want to include a link within the user’s profile or settings to sign out.
The reset password flow works by sending a link to the users email that leads them to change their password in the browser. It’s also possible to deep link back to the app when this process is completed. You can read more about this here: https://firebase.google.com/docs/auth/ios/manage-users#send_a_password_reset_email
5. Setup token verification on the server
Next we’ll turn to the work needed within Rails. Firebase does not have an Admin SDK for Ruby so we’ll be using a gem called firebase_id_token to verify the token. Follow the instructions within the gem readme to set up token verification. More details about token verification can be found here: https://firebase.google.com/docs/auth/admin/verify-id-tokens
Within application.rb I’ve also added the following to trigger the rake task for updating the certs on start up of the server. You’ll also want to setup the rake task you’ve created on a scheduler as detailed in the gem readme.
# application.rb

class Application < Rails::Application
  config.after_initialize do
    Rails.application.load_tasks
   Rake::Task['firebase:certificates:request'].invoke
  end
end
6. Update the user model
Run a migration on your user model to add email and firebase_external_id attributes.
7. Setup an AuthenticationManager on the server
Add an AuthenticationManager within on the server to verify the Firebase token and use it to find the current user or authenticate an endpoint.
# AuthenticationManager.rb

class AuthenticationManager
  def initialize(token:)
    @token = FirebaseIdToken::Signature.verify(token)
  end

  def find_or_create_user!
    User.find_or_create_by!(
      email: @token["email"],
      firebase_id: @token["user_id"]
    )
  end

  def current_user
    User.find_by(
      email: @token["email"],
      firebase_id: @token["user_id"]
    )
  end

  def authenticate_user
    current_user.present?
  end
end
Then add an authenticate_user method to your ApplicationController to be able to use as a before_action to restrict controller actions. The current_user method can also be used to scope resources to specific users within your controllers.
class ApplicationController < ActionController::Base
  def authenticate_user
    render json: {}, status: 401 unless authentication_manager.authenticate_user
  end

  def current_user
    authentication_manager.current_user
  end

  def authentication_manager
    AuthenticationManager.new(
      token: request.headers["HTTP_FIREBASE_TOKEN"]
    )
  end
end
8. Add an endpoint to create a user
With the AuthenticationManager in place on the server, the last step is to add a user creation endpoint and hit it after you’ve successfully created a user within Firebase on the client.
Create the user creation endpoint:
# AuthenticationController.rb

class AuthenticationController < ApplicationController
  def create
    authentication_manager.find_or_create_user!
  end
end
Next return to the client and add a AuthenticateAPI class that will handle posting the token to the client to create the user:
// AuthenticateAPI.swift

class AuthenticateAPI: API {
  func create(successHandler: @escaping () -> Void,
              errorHandler: @escaping (_ errors: String) -> Void) {
    let url = self.baseURL + "authentication.json"
    authenticatedRequest(
      url: url,
      method: .post,
      successHandler: { data in
        successHandler()
      }, errorHandler: { errors in
        errorHandler(errors)
      }
    )
  }
}
Then modify the success handler you’re passing to AuthenticationManager.signUp function to call the user creation endpoint. This success handler would be found wherever you are calling AuthenticationManager.signUp, in my case it’s in the SignUpViewController This is intended to be called after a user has successfully been created on Firebase.
// SignUpViewController.swift

private func successHandler() {
  AuthenticateAPI().create(
    successHandler: {
     Router.navigateToRoot(context: self)
   }, errorHandler: { error in
     self.alert(message: error)
   }
  )
}
That’s the basic steps to get auth working across the client and server. Hope that helps others get started in securing their APIs with Firebase Auth. Thanks and would love any feedback or questions at [email protected].